IDMWORKS’ will illuminate on how to configure the preventive SOD rules and policies in Oracle Identity Governance 12c PS3.
Note: Oracle Identity Manager (OIM) and Oracle Identity Governance are synonyms and used interchangeably. This configuration also applies to OIM.
What is Segregation of Duties/Separation of Duties (SOD)?
SODis shared responsibilities of any key processes that disperses the critical functions of such processes to more than one person. It is also a kind of risk management where the risk of a single person having all accesses is prevented.
SOD Rules and Policies can be created in OIG 12c using the compliance tab. This is an out-of-the-box functionality which Oracle offers in order to prevent an end-user from requesting for any toxic combination of Application Instance, Entitlements, or Roles from the OIG catalog.
There are two types of SOD policies which you can create in OIG 12c:
- Preventive SOD Policy: This Policy will be triggered when a requester/beneficiary is trying to raise a toxic access through the OIG 12c catalog. When they submit the request the policy will be triggered to thwart the user from raising non-compliant access.
- Detective SOD Policy: This Policy will be triggered for all the existing users in OIG – user base which already has the access to any toxic combination of Application instance, Entitlements or Roles. This policy will be triggered when respective scan definitions are executed from OIG 12c – Compliance tab.
In this blog, we will see how to create Preventive SOD policies in OIG 12c PS3.
Pre-Requisites
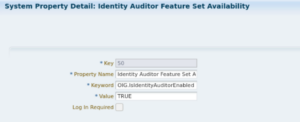
In order to create the SOD policies in OIG 12c, first, make sure that the Compliance Tab is enabled by marking the Configuration Properties named as “Identity Auditor Feature Set Availability” is set to “TRUE” and OIM servers are restarted post the mentioned changes. See the picture below:
Steps to Create SOD Rule
1. Login to OIG 12c – Identity Self Service Console using “XELSYSADM” user.
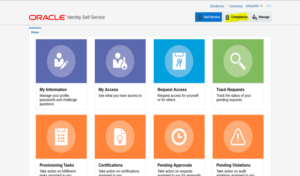
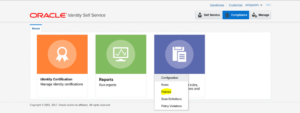
2. One logged in, the landing page below will be shown:

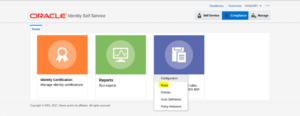
3. Click on Compliance Tab in upper right corner. Refer to the tab highlighted in yellow.
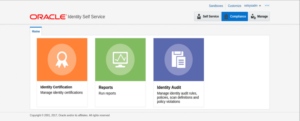
4. Once the Compliance button has been clicked, the page below will display.
5. Click on the tile named as “Identity Audit” and the page below will display.

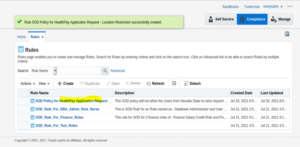
6. Click on Rules Option.
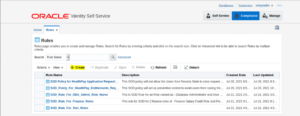
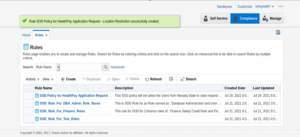
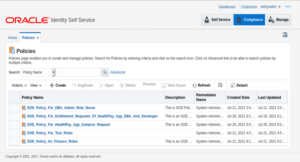
7. Click on Rules tab, the page below will provide a summary of Rules created up to now.

8. Click on the Create button.
9. The page of Rule creation will be displayed
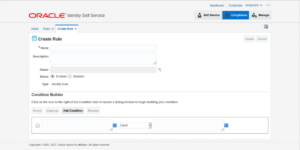
10. Fill in all the required details as per the screenshot and reference table below.
| Parameter Name | Parameter Value |
| Name | <This should be name of SOD rule which you have to provide. Provide a rule name which could be understood by end users> |
| Description | <This should be SOD rule description> |
| Owner | System Administrator |
| Status | Enable |
| Type | Identity Audit |
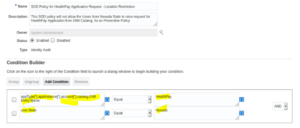
| Condition Builder | <Condition Builder will contain the condition which will be evaluated to determine the policy violation>. In our example we have 2 rules defined which are logically attached using AND logic operation. |
| Rule in Condition Builder |
| appType[*].appInstance[*].account[*].catalog.OIM Entity Name = HealthPay |
| AND |
| user.State = Nevada |
The rule means:
- If the user has selected “HealthPay” application in the OIG catalog and if his UDF of State has the value as “Nevada”, then, there is policy violation and user should be prevented from raising the request.
11. Once all the required details are filled in click on the Create button.
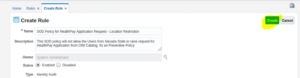
12. The SOD rule will be successfully created and the prompt below will display.
The SOW is now created.
Steps to Create SOD Policy
1. Once the SOD Rule is created, the SOD policy must be created next so that the created rule can be attached to it and then it can be triggered to prevent users from raising toxic combinations.
2. Login to OIG 12c – Identity Self Service Console using “XELSYSADM” user.
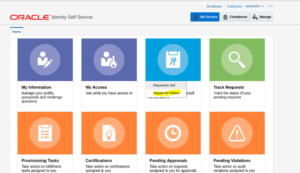
3. Once logged in, the landing page below will display.
4. Click on the Compliance Tab in the upper right corner. Refer to the tab highlighted in yellow.

5. Once the Compliance button is clicked, the page below will display.

6. Click on the Tile named as “Identity Audit” and the options below will be displayed.

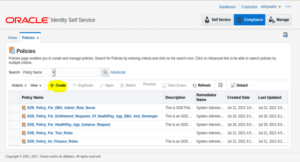
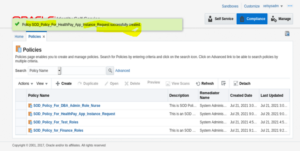
7. Click on Policies Option.
8. Click on Policies, the page below will display with the list of policies created.
9. Click on the Create button.
10. The page below will display.
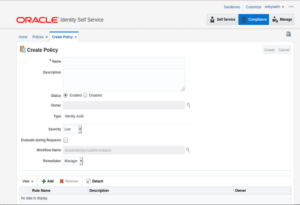
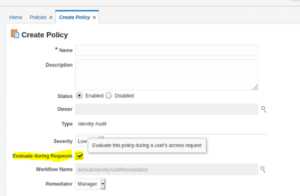
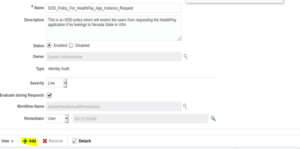
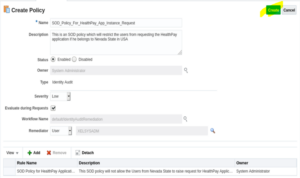
11. Fill in all the required details to create an SOD Policy. Refer to the screenshot and table below.
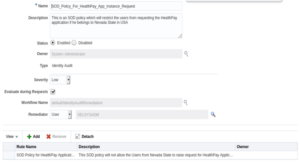
| Parameter Name | Parameter Value |
| Name | <This should be name of SOD rule which you have to provide. Provide a rule name which could be understood by end users> |
| Description | <This should be SOD rule description> |
| Status | Enable |
| Owner | System Administrator |
| Type | Identity Audit |
| Severity | Low |
| Evaluate during Requests | Checked <This checkbox will enable the preventive control of this SOD policy which we are creating> |
| Workflow Name | Default/IdentityAuditRemediation |
| Remediator | User 🡪 “User Name” <In our example, we are keeping it as XELSYSADM user> |
12. Add the SOD rule against which the policy has to be triggered. Click on Add.
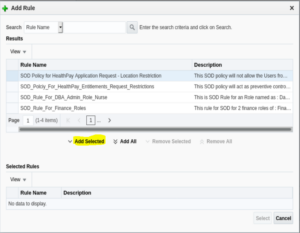
13. The popup below will display.
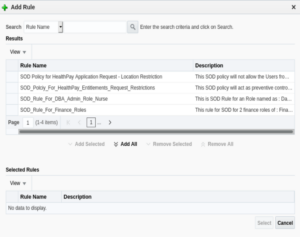
14. Select the Rule name against which the policy has to be triggered. In this example, the rule name is: SOD Policy for HealthPay Application Request – Location Restriction.
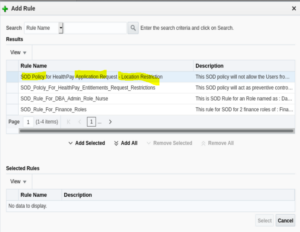
15. Once selected in theResults panel, click on the Add Selected button.
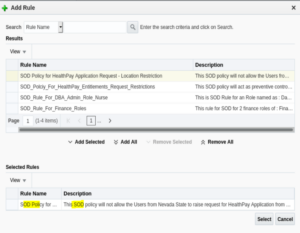
16. The respective SOD will be selected in the “Selected Rules” panel.
17. Click on the Select button.
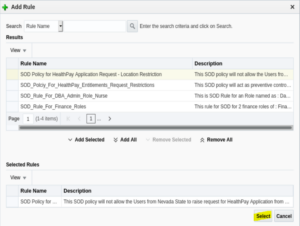
18. The rule will be successfully attached to the policy. Note, that more than one rule can be attached to a policy.

19. Click on the Create button in order to create the SOD policy.
20. The SOD policy has been created successfully.
Test the SOD – Preventive Flow
1. Login to OIG – Identity Self Service console.
2. Navigate to: Request Access > Request for Others.
3. Select the target user.
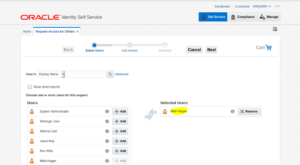
4. Click on Next.
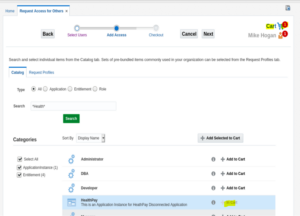
5. Search for target application in the catalog.
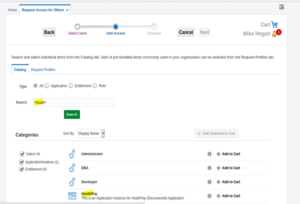
6. Click Add to Cart for the selected item.
7. Click on Next.
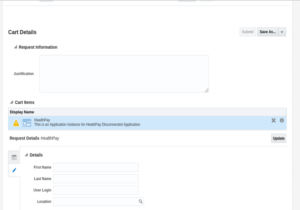
8. The Catalog summary page below will be displayed.
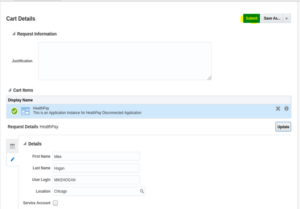
9. Click on Update and Submit.
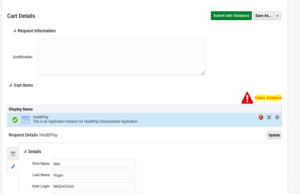
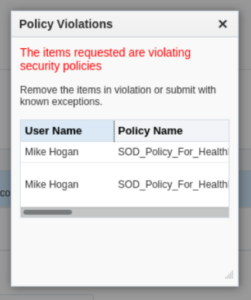
10. After submission the policy violation warning will be triggered.
Known Issues
Issue # 1: The SOD Policy is not getting triggered while submitting the toxic request on the catalog.
Issue Details
- There might be a case that after creating an SOD policy in OIG that the policy is not getting triggered when the user has raised a request with toxic combinations from OIG – Request Page/Catalog Page.
- The main reason for this issue could be with configurations while creating the SOD policy in OIG.
Resolution:
- While creating an SOD in OIG, make sure that the check box named as: Evaluate during Requests is checked.